
TL;DR
The key to a quiet, clear closet booth isn’t just foam — it’s smart placement, reflection control, and ventilation. Moving your gear into a closet with the right setup transforms a cramped, echoey space into a professional-sounding studio.
Ever tried recording vocals or streaming from a tiny closet? It’s often a love-hate relationship. You get a cozy space, but the sound? Usually a boxy mess. The good news: with the right moves, you can turn that cramped closet into a surprisingly effective studio. The secret isn’t just foam and blankets — it’s placement, reflection control, and understanding the space’s limits.
This guide walks you through how to maximize your closet’s potential, whether you’re building a DIY booth or just trying to tame the echo. From dampening to ventilation, you’ll get actionable tips to make your small space sound big.
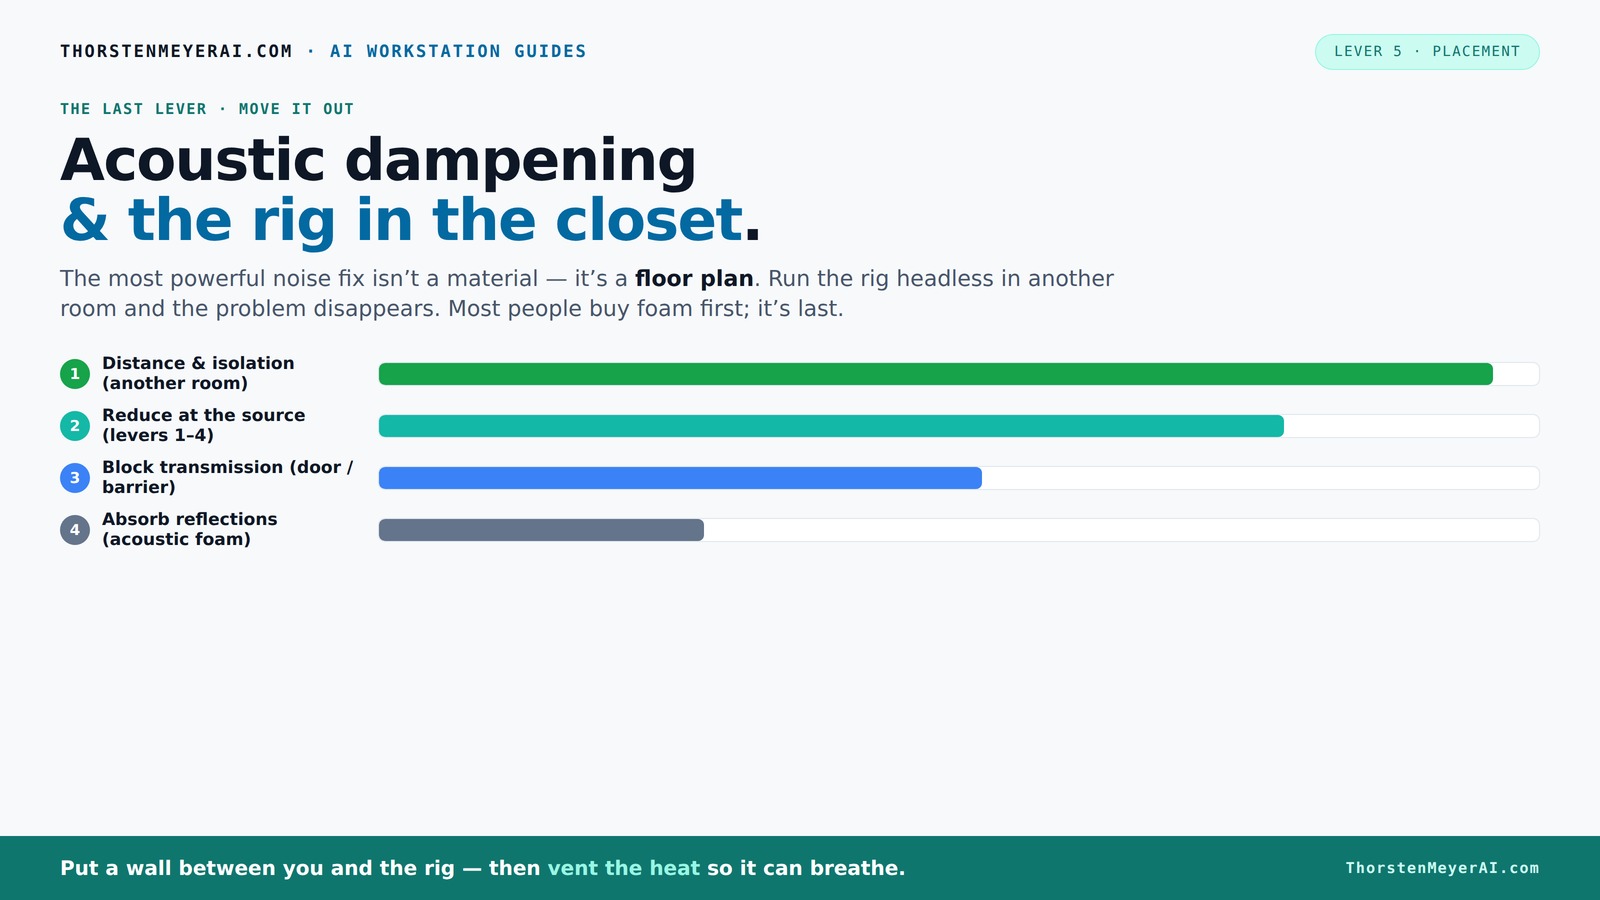
Acoustic dampening
& the rig in the closet.
The most powerful noise fix isn’t a material — it’s a floor plan. A rig you can’t hear because it’s in another room beats any amount of foam. Tap the approaches in Part 1 to see what actually works.
(another room)
(levers 1–4)
(door / barrier)
(acoustic foam)
Contain the noise, not the heat
Key Takeaways
- Always treat reflection points, especially behind the mic and on side walls, for clear vocals.
- Sealing gaps and treating the door is just as important as adding foam — sound leaks ruin recordings.
- In tiny booths, low-frequency buildup can be fixed with corner bass traps or DIY foam, preventing muddiness.
- Moving the rig into another room or closet is often the simplest way to eliminate noise entirely.
- Proper ventilation in closet setups prevents heat throttling and keeps your gear running smoothly.

Focusound 52 Pack Acoustic Foam Panels 1" x 12" x 12" Sound Proof Foam Panles Soundproofing Noise Cancelling Wedge Panels for Home Office Recoding Studio with 300PCS Double-Side Adhesive
Soundproofing - Acoustic foam panels triangular grooves structure for better noise absorption, helps to reduce and absorb unwanted...
As an affiliate, we earn on qualifying purchases.
As an affiliate, we earn on qualifying purchases.
Why Acoustic Dampening Isn’t Just About Foam — It’s About Reflection Control
Many assume foam panels are the magic fix. Not quite. Acoustic dampening in a closet is really about managing how sound bounces inside the space. Dense materials like moving blankets or thick panels absorb those pesky reflections that cause muddiness and boomy lows.
For example, hanging a blanket behind your mic and on the ceiling can cut early reflections by 50-60%, dramatically improving vocal clarity. Remember, foam alone won’t block sound from leaking out; it only softens echoes inside.
Understanding this distinction matters because it clarifies your priorities. Reflection control directly impacts the clarity and intimacy of recordings, especially in small, reflective environments. While soundproofing prevents sound from escaping or entering, reflection management makes the sound you produce more professional and less muddled. The tradeoff is that reflection control is usually more cost-effective and easier to implement in a closet than full soundproofing, which can be expensive and invasive. Recognizing this helps you allocate your resources wisely — focus on the main reflection points first, then consider sealing gaps if needed.

TroyStudio Portable Vocal Booth, Large Foldable Microphone Isolation Shield, Music Recording Studio Sound Echo Absorbing Box, Desk & Stand Use Reflection Filter with Thickened Dense Acoustic Foam
【BASIC INFO】: Inside size after setup: 8'' (L) X 10'' (W) X 12'' (H), large space for various...
As an affiliate, we earn on qualifying purchases.
As an affiliate, we earn on qualifying purchases.
Where to Place Acoustic Treatments for Maximum Effect in a Tiny Closet
Location is everything in a closet booth. The best way to tame reflections? Focus on the first reflection points — where sound from your mouth first hits the walls, ceiling, and floor.
Use a mirror to find these spots: sit in your usual recording position and hold a mirror against the wall. Wherever you see your mic or speaker in the mirror, those are your reflection points. Place panels, blankets, or foam there.
Don’t forget the door. Treat or seal gaps to prevent sound leaks. Sealing gaps with weatherstripping or adding a heavy curtain over the door can significantly reduce sound escape and outside noise intrusion. Additionally, placing a rug or foam pad on the floor not only absorbs low-end boom but also prevents sound from bouncing back up, which can cause muddiness. The goal is to create a balanced environment where sound waves are absorbed or diffused at their primary reflection points, minimizing echo and enhancing clarity. This targeted approach ensures that every dollar spent on treatments yields maximum audible benefit, especially in the confined space of a closet.

24 Pack Black 12 x 12 x 2 Inches Pyramid Designed Acoustic Foam Panels, Sound Proof Foam Panels for Walls, High Density and Flame-Retardant Acoustic Panels, Sound Panels for Recording and Home Studio
Exceptional Sound Absorption:These pyramid acoustic panels are engineered to effectively absorb sound waves, reducing echo and reverberation. With...
As an affiliate, we earn on qualifying purchases.
As an affiliate, we earn on qualifying purchases.
The Hidden Challenge: Low-End Buildup and How to Fix It
Small closets often suffer from bass buildup — that boomy, muddy sound that makes your voice or instruments sound hollow. This happens because parallel walls create standing waves, trapping low frequencies. If unaddressed, this low-end resonance can dominate your recordings, making them sound less natural and more cluttered. Consider installing bass traps in the upper corners or along the floor to absorb these problematic low frequencies.
The fix? Bass traps in the upper corners or along the floor can absorb these problematic low frequencies. Installing a thick blanket or foam panel in each corner acts as an effective DIY bass trap, disrupting standing waves and reducing muddiness. This process is crucial because low frequencies tend to reflect and resonate longer in small, enclosed spaces, creating a boominess that can’t be fixed by simply adding high-frequency absorption. For larger or persistent issues, professional bass traps or tuned resonators can be used, but for most closet setups, corner trapping with dense materials provides a practical, cost-effective solution. Addressing low-end buildup ensures your recordings retain clarity across the full spectrum, preventing the muffled, boomy sound that often plagues tiny booths.

Aokeo Microphone Isolation Shield, Foldable Mic Shield with Triple Sound Insulation, Reflection Filter with 3/8" and 5/8" Mic Threaded Mount for Recording Studio, Podcasts, Singing, and Broadcasting
The Microphone Isolation Shield features a sound-proof foam front and a ventilated metal back panel to eliminate noise...
As an affiliate, we earn on qualifying purchases.
As an affiliate, we earn on qualifying purchases.
How to Position Your Microphone & Desk for Clear, Natural Sound
Microphone placement in a closet booth isn’t just about where it fits; it’s about where it “sees” good sound. Aim the mic toward the primary reflection points and keep hard surfaces away from the mic’s line of sight.
Place your mic about 6-12 inches from your mouth, slightly off-axis if possible. Use a shock mount or a foam windscreen to reduce mechanical noise. Keep your desk clutter-free — hard surfaces like keyboards and shelves reflect sound and can muddy your recording. For more tips on optimal microphone placement, visit Perfect Fit Living.
Effective microphone placement involves more than just distance; it’s about positioning the mic to capture the most natural sound while minimizing reflections. Keeping the mic slightly off-axis reduces the pickup of harsh reflections from nearby surfaces. Using a shock mount isolates mechanical noise, ensuring cleaner recordings. Additionally, softening or covering reflective surfaces on your desk, such as with foam pads or cloth, prevents sound bouncing back into the mic. Proper positioning and surface treatment work together to produce a more natural, balanced recording, even within the confines of a tiny closet.
Ventilation and Heat Management — Keep Your Closet Cool and Quiet
Putting a hot, high-powered rig in a closet sounds simple — but heat build-up is a real danger. Without proper ventilation, temperatures can soar, causing throttling and fan noise that defeats your quiet setup. Learn more about home ventilation solutions at Top Ceiling Fans.
To prevent this, use active ventilation like exhaust fans or ducted airflow. A small, quiet fan pulling hot air out and fresh air in keeps temperatures stable. For example, a streamer installed a vented panel with a low-noise fan that maintained a steady 70°F, even after hours of recording.
Proper ventilation isn’t just about cooling; it’s about balancing airflow with noise reduction. Using a low-noise fan and sealing gaps around vents or outlets ensures that heat is expelled without introducing unwanted noise into your recordings. Neglecting heat management can lead to overheating, which not only damages your gear but also causes the fans to spin faster and louder, reintroducing noise into your recordings. The right ventilation strategy maintains a stable environment, prolongs your equipment’s lifespan, and preserves the quiet ambiance necessary for high-quality recordings.
Frequently Asked Questions
Is foam enough for a closet studio?
Usually not. Foam helps with early reflections and echo reduction but doesn’t block sound from leaking out or handle low-frequency issues. Combining foam with door sealing, bass traps, and reflection points makes a much bigger difference.Where should I place acoustic panels in my closet?
Place panels at the first reflection points — behind the mic, on side walls, and on the ceiling. Use a mirror trick to find these spots and treat them for the best vocal clarity.Do I need bass traps in a tiny booth?
Yes, if you notice boominess or muddiness in your recordings. Corner bass traps or DIY foam in the corners can absorb low frequencies and keep your sound tight.How do I stop sound from leaking out of the closet?
Seal gaps around the door with weatherstripping, add blankets or soundproofing panels, and block outlets or vents. These steps prevent sound from escaping and reduce outside noise.What’s the best way to ventilate a closet rig?
Use a quiet exhaust fan or ducted airflow system to actively move hot air out. Proper ventilation keeps your gear cool and prevents heat buildup that causes noise and throttling.Conclusion
Transforming a closet into a professional-sounding booth isn’t about expensive gear — it’s about smart placement, reflection control, and ventilation. Treat the main reflection points, seal gaps, and give your rig room to breathe. The result? Crisp, clear recordings and a workspace that sounds as good as it looks.
Next time you see that tiny closet, remember: with a few strategic moves, you can turn it into your secret weapon for pro-quality audio. Your voice, your music, your streams — all deserve to sound this good.